How to Set Up Your Payment Information
Table of Contents:
Setting up your payment information correctly is crucial to ensure smooth transactions on OneForma. This guide will help you better understand the process for setting up payment information for USD, EUR, JPY, and CNY payments.
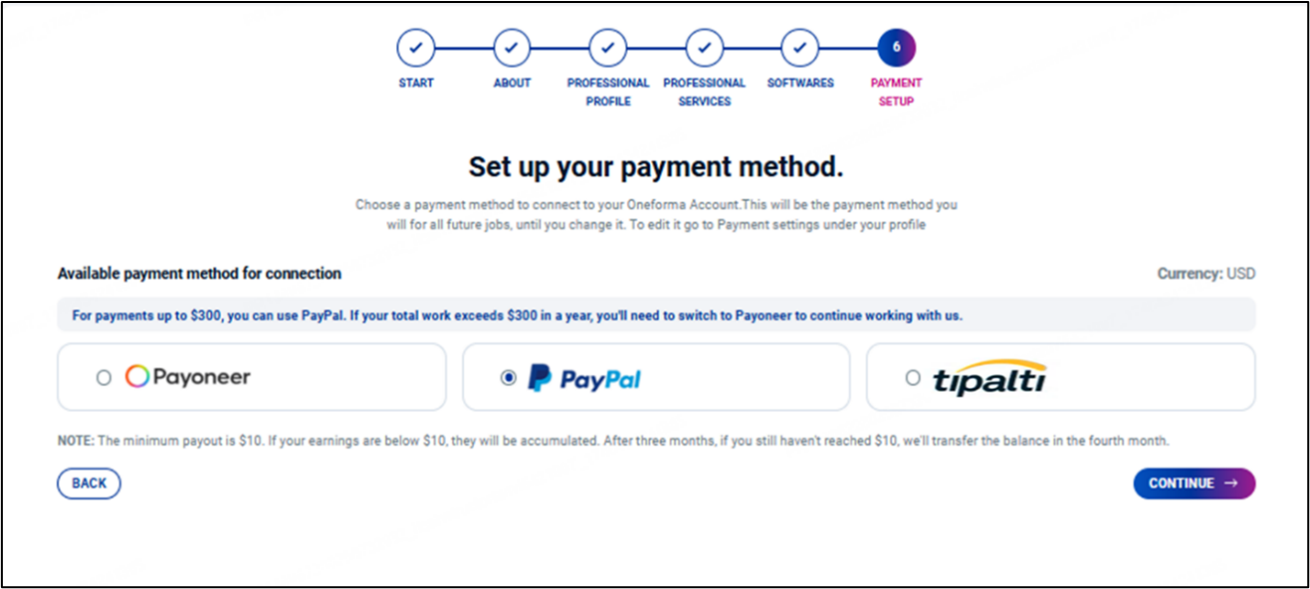
- Choose from the available payment methods.
- PayPal (up to $300/year)
- Payoneer
- Tipalti (for PayPal over $300/year or bank transfer)
- Bank Account (available only for resources based in China with the selected legal entity as China)
Note: During the onboarding process, you can select only one payment method. However, after onboarding, you can configure Multiple Payment Method Setup and set one of them as your default payment method.
- Click Continue to proceed with the setup of the selected payment method.
- Compete the setup of the chosen platform and click Conclude.
- Make sure to read the Non-Disclosure Agreement (NDA) and select the checkbox.
- Click See Jobs to complete the Onboarding process; this will redirect you to your profile dashboard.
Payoneer Set up
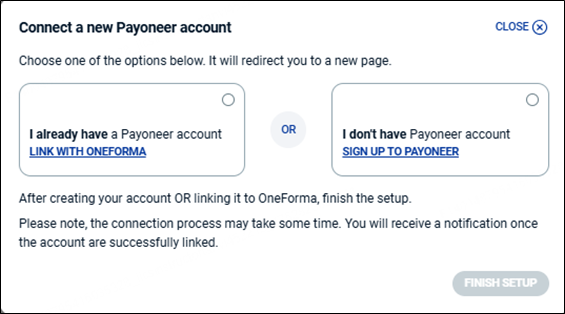
If you select Payoneer, follow the steps below:
- You will be asked to connect to a Payoneer account.
- If you already have an account, select ‘I already have a Payoneer account’ or click Link with OneForma. You will be redirected to the Payoneer website to log in.
- If you do not have an account, select ‘I don’t have Payoneer account’ or click Sign Up to Payoneer. You will be redirected to the Payoneer sign-up page, where you can register as an Individual (Freelancer).
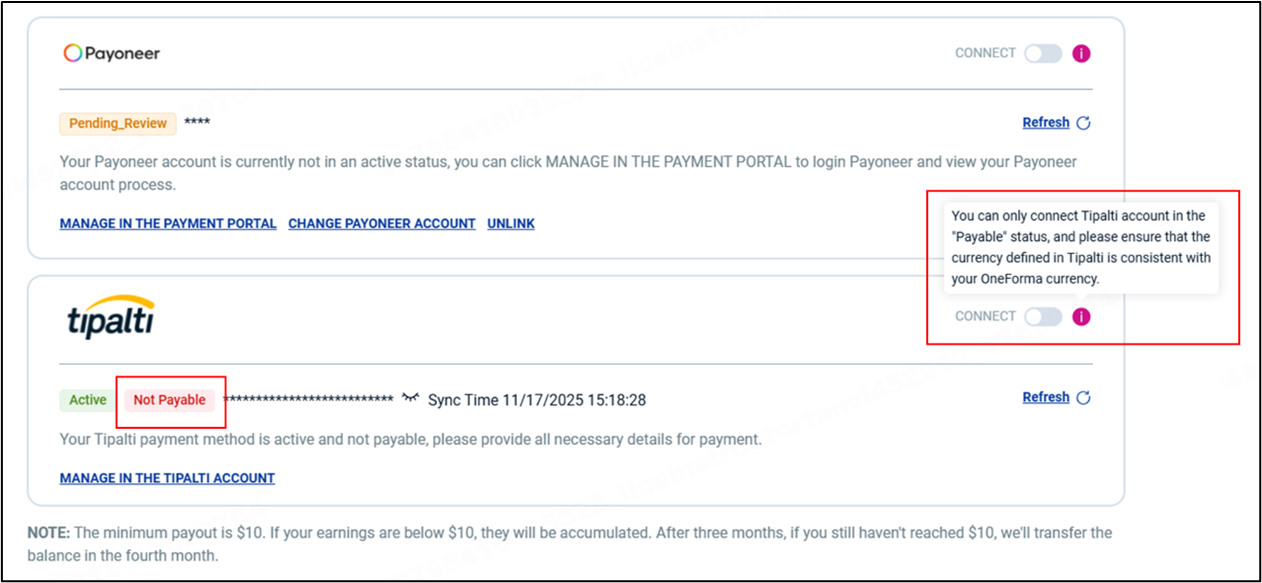
Payoneer Setup Status
| Status | Description |
| Pending | Waiting for timer check result |
| Pending_review | Payoneer account is under review; user should log in to Payoneer to check the progress |
| Approved | Payoneer setup is completed |
| Active | Payoneer account is fully active and can receive payments |
| Inactive | Abnormal situation, user should be notified |
| Blacklisted | Payoneer account is blacklisted |
| BindingConflict | Payoneer account is already bound to another user |
Note:
- If your Payoneer account status does not update in time, use the Refresh button to re-sync the status from the Payoneer platform.
- The Connect option is enabled only when your Payoneer status is Approved. For any other status, the Connect option remains disabled, and the payment method is not considered valid for payments.

PayPal Set up
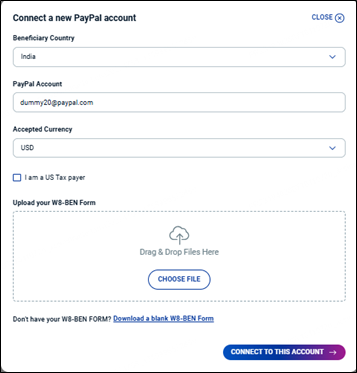
If you select PayPal, follow the steps below:
- Select the Beneficiary Country, enter the PayPal Account, and verify the Accepted Currency.
- Depending on your selected Beneficiary Country, download and upload the appropriate tax form.
- If you select United States as the Beneficiary Country, download the W-9 form, fill it, and click Choose File to upload it.
- If you select any other country, download the W-8BEN form, fill it, and click Choose File to upload it.
- Click Connect to this Account.
Tipalti Set up
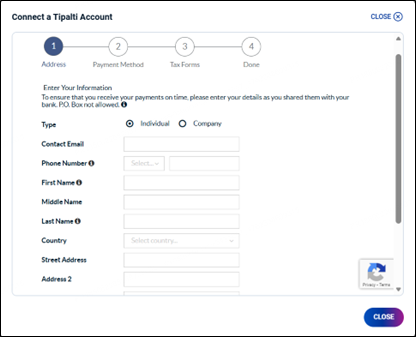
If you select Tipalti, follow the steps below:
Step 1: Address
- Select the Type as either Individual or Company.
- If you select Individual, enter your Contact Email and Phone Number.
Note: If you select Company, you will additionally need to provide your Company Name along with the standard information you fill as an individual. - Enter your First Name, Middle Name, and Last Name.
- Select your Country of Residence, then enter your Address, City, and ZIP Code.
Note: Depending on the country selected, you may be required to provide additional details such as your Date of Birth and Country of Birth or State. - Scroll down and click Next to proceed.
Step 2: Payment Method
- Select the Payment Method from the dropdown list —Local Bank Transfer, Wire Transfer, Check or PayPal.
- Configure the selected payment method by following the steps provided in its respective section, and then click Next to proceed.
Note: The Connect option for Tipalti is enabled only when the selected Tipalti currency matches the default currency set in your OneForma profile and the account status is Payable. If the currencies do not match or the account status is not Payable, the Connect option remains disabled, and the payment method will not be considered valid for payments until successfully connected.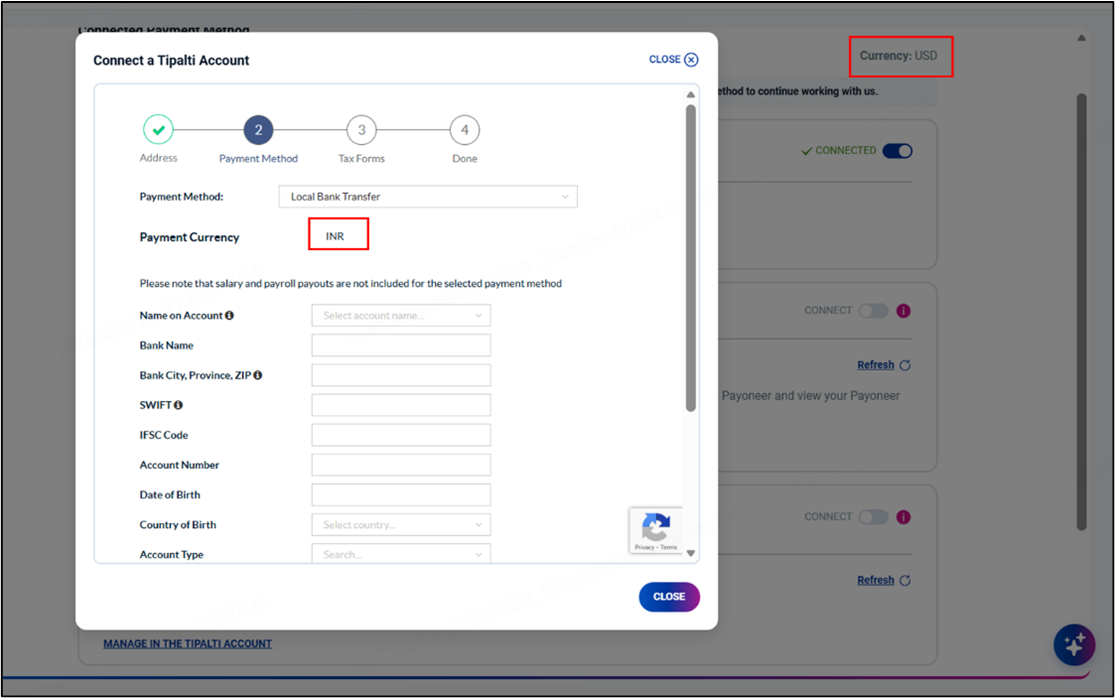
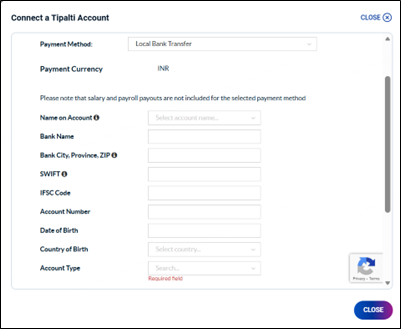
Local Bank Transfer
If you select Local Bank Transfer, the payment currency will automatically be set based on the country of residence selected in the previous step.
Provide the following details to configure your local bank transfer:
- Enter Name on Account.
- Enter Bank Name, City, Province, and ZIP Code.
- Enter the SWIFT Code and IFSC Code.
- Enter your Account Number.
- Enter your Date of Birth and select your Country of Birth.
- Select the Account Type from the dropdown list.
- Select the checkbox “I agree to Tipalti’s Terms of Service and Tipalti’s Privacy Policy.”
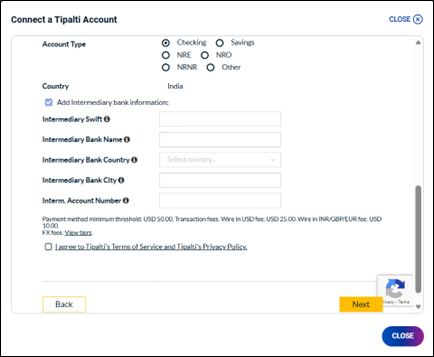
Wire Transfer
If you select Wire Transfer, provide the following details:
- Select the Payment Currency.
- Enter the Name on Account, Account Number, IFSC code, Phone Number, and SWIFT Code.
- Enter the Bank Name, Bank Address, Bank City, Province, ZIP Code and Bank PIN Code.
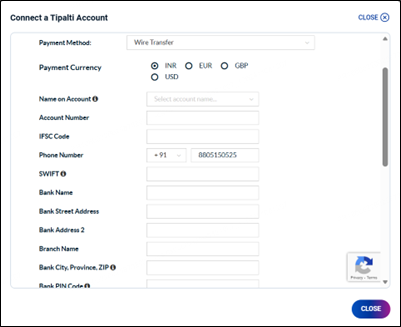
- Select the Account Type from the available options.
- Select the checkbox if you need to add Intermediary Bank Information if required.
- Enter Intermediary SWIFT code.
- Enter Intermediary Bank Name, Country and City.
- Enter Interm. Account Number.
- Select the checkbox “I agree to Tipalti’s Terms of Service and Tipalti’s Privacy Policy.
Check
If you select Check, provide the following details:
- Choose the Name on the Check from the dropdown. The Address field will automatically populate with the address you provided in the previous step.
- Select the checkbox “I agree to Tipalti’s Terms of Service and Tipalti’s Privacy Policy.”
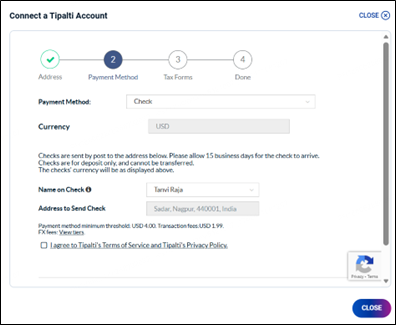
- Click Next to proceed.
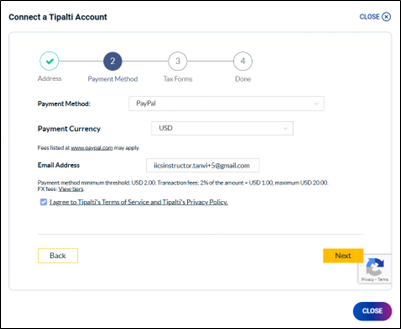
PayPal
If you select PayPal, provide the following details:
- Select the Payment Currency from the drop-down list.
- Enter Email Address associated with your PayPal account.
- Select the checkbox “I agree to Tipalti’s Terms of Service and Tipalti’s Privacy Policy.”
Step 3: Tax Forma
- Select the applicable Tax Form from the available options.
- Click Complete Form.
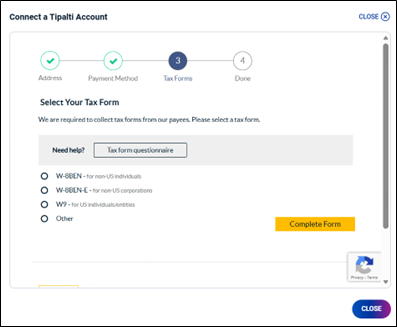
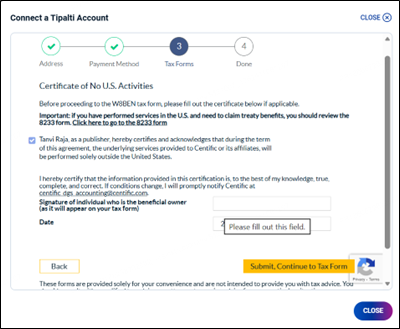
W-8BEN- for non-US individuals/ W-8BEN-E for non-US corporations
- Select the checkbox to acknowledge the terms of the agreement and enter your signature.
- Click Submit, Continue to the Tax Form.
Identification of Beneficial Owner (Part 1)
- Enter the following details:
- If you have selected W-8BEN form, enter Name and select the Country of Citizenship from the drop-down list.
- If you have selected the W-8BEN-E form, then enter Name of Organization, Country of Incorporation or Organization and select the Type of Entity.
- Enter your permanent residence details such as Country, Address, City and Zip.
Note: If your permanent address is the same as the contact address provided in Step 1, keep the “same as contact address” checkbox selected. - Enter your mailing address details such as Country, Address, City and Zip.
Note: If your permanent address is the same as the contact address provided in Step 1, keep the “same as permanent address” checkbox selected. - Click Continue.

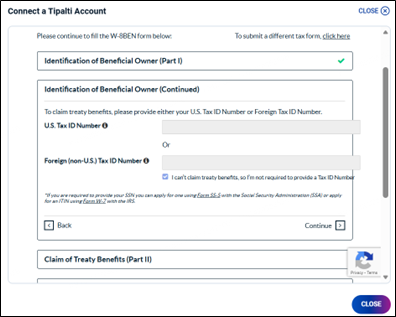
Identification of Beneficial Owner (Continued)
- To claim treaty benefits, enter either your U.S. Tax ID Number or Foreign Tax ID Number.
- Note: Select the checkbox “I can’t claim treaty benefits, so I’m not required to provide a Tax ID Number” if not applicable to you.
- Click Continue.
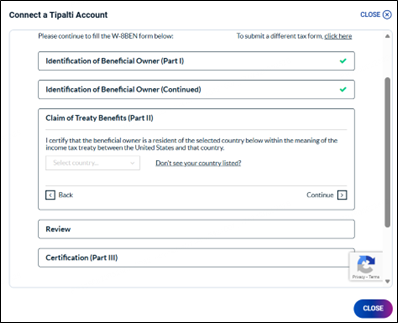
Claim of Treaty Benefits (Part II)
- Select your country from the drop-down list to certify that you are a resident of the selected country under the income tax treaty with the United States.
- Note: If you have selected W-8BEN-E form, select the checkbox to claim treaty benefits and choose the applicable option from the available list.
- Click Continue.
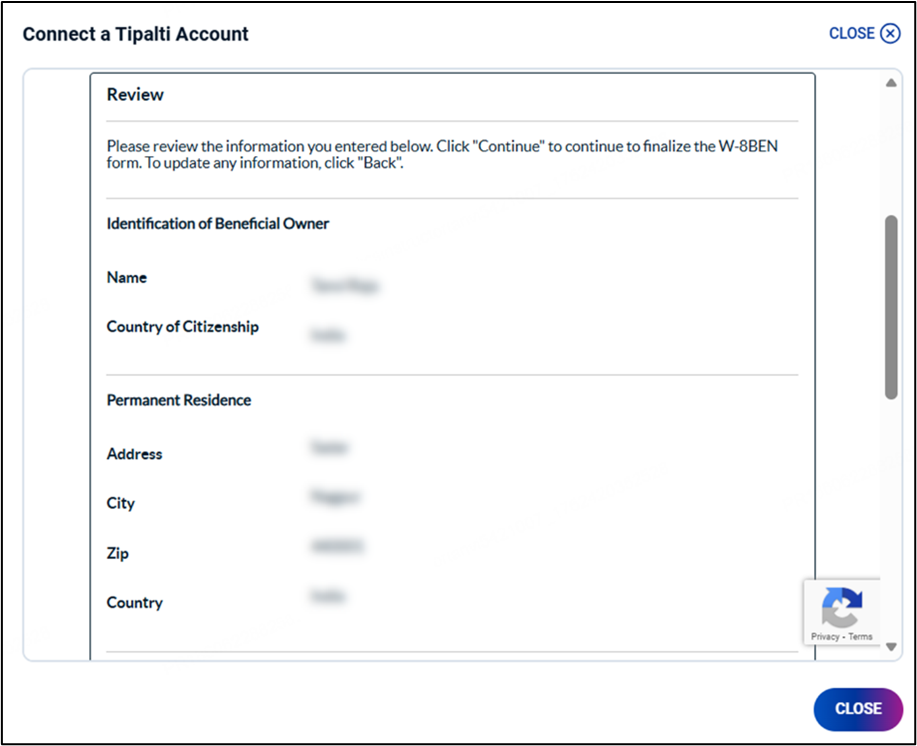
Review
- Review all the information you have entered.
- To update any information, click Back. Click Continue to finalize the selected form.
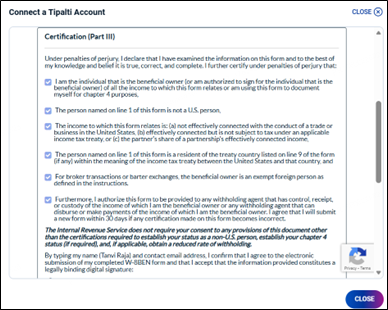
Certification (Part III)
- Select the checkbox to confirm that you have reviewed the information provided on the form, and certify that all details are true, correct, and complete to the best of your knowledge.
- Type your full name and contact email address to confirm your agreement to electronically submit the completed form.
- Then, select one of the following options:
- If you have selected W-8BEN form, choose from the options below.
- I am signing for myself
- I am signing on behalf of someone else, under power of attorney
- I am signing on behalf of someone else
- If you have selected W-8BEN-E form, select the checkbox ‘I certify that I have the capacity to sign for the entity identified on line 1 of this form’.
- If you have selected W-8BEN form, choose from the options below.
- Click Submit Form.
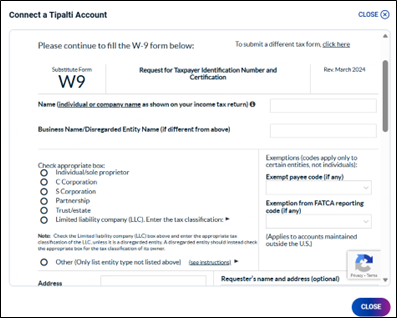
W9- for US Individuals/entities
- Enter individual or company name as per displayed on your income tax return.
- Enter Business/ Disregarded Entity Name if required.
- Select the appropriate entity type by checking one of the available options.
- Note: If you are a disregarded entity, select the tax classification of your owner instead of selecting LLC.
- Provide exemption details (if applicable):
- Enter the Exempt Payee Code (if any).
- Enter the Exemption from FATCA Reporting Code (if applicable for accounts outside the U.S.).
- Enter your Address, City, State and ZIP Code.
Note: You may also enter the requester’s name, address, and account number(s), if required. - Provide your Taxpayer Identification Number (TIN):
- Enter your Social Security Number (SSN) or Employer Identification Number (EIN) in the appropriate field.
- Read the Certification section carefully.
- Provide your electronic signature:
- Type your full name and contact email address to confirm electronic submission of your completed W-9 form.
- Enter the Date Signed and Contact Email.
- Click Next to proceed.
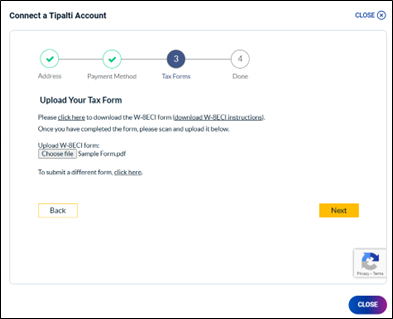
Others
- Select the applicable tax form from the drop-down list.
- Click Complete Form.
- Download the selected tax form and fill in all the required details.
- Click Choose file to upload the form.
- Click Next to proceed.
Step 4: Done
You will get a confirmation message for setup completion. To review your previous steps, click Back and then click Edit to edit the selected form. After editing, proceed through all the steps again until this final confirmation. Click Close to exit the setup page.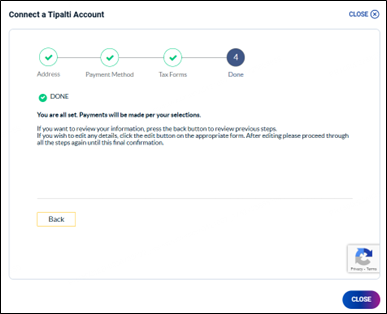
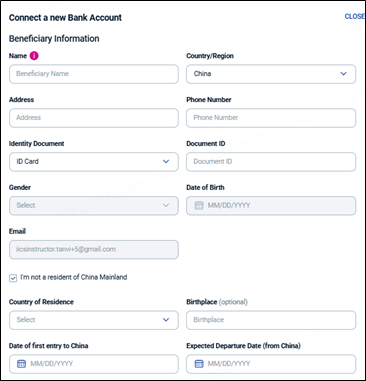
Bank Transfer (China Only)
If you are a user based in China, you will need to set up your Bank Details.
- Enter Beneficiary Information such as Name, Country/Region, Address, Phone Number.
- Depending on Country/Region selected you can select an Identity Document from the drop-down and enter Document ID.
- Note: If ID Card is selected as the identity document, the Gender and Date of Birth fields will be automatically populated based on the ID card details and will become non-editable.
- Enter Gender and Date of Birth.
- If you are not a resident of China, select the checkbox ‘I am not a resident of China Mainland’. You are a resident of China, then keep this box unselected.
- Select the Country of Residence.
- Optionally, enter your Birthplace.
- Enter your Date of Entry to China and Expected Departure Date from China.
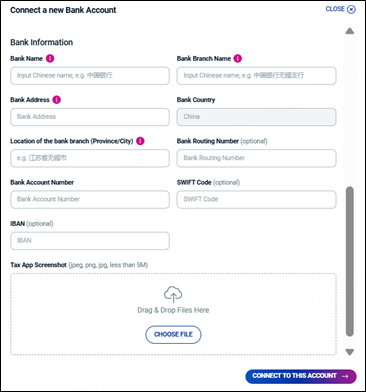
- Enter Bank details such as Bank Name, Branch Name, Address, Location of the Bank Branch (Province/City) and Bank Account Number.
- Optionally enter Bank Routing Number, SWIFT Code and IBAN.
- Upload the Tax App Screenshot.
- Click Connect to this Account.
Wrap-Up
And there you have it! Following these steps will help you set up your payment information quickly and easily. Always be sure to stay up to date on OneForma’s payment policies, in case changes impact which currencies are available to you.
Need More Help?
OneForma Support is here to help! If this article hasn’t given you the answers you’re looking for, try reaching out to us here. We’ll get back to you as soon as possible.