How to Create Your Account
Table of Contents:
Creating your profile is an essential step toward participating in projects and receiving payments from OneForma. This guide explains the steps required to ensure your profile is fully activated and meets all platform requirements.
Once a Resource Manager (RM) or Vendor Manager (VM) sends you an onboarding invitation, you will receive an email with a registration link to begin the process.
Registration Steps
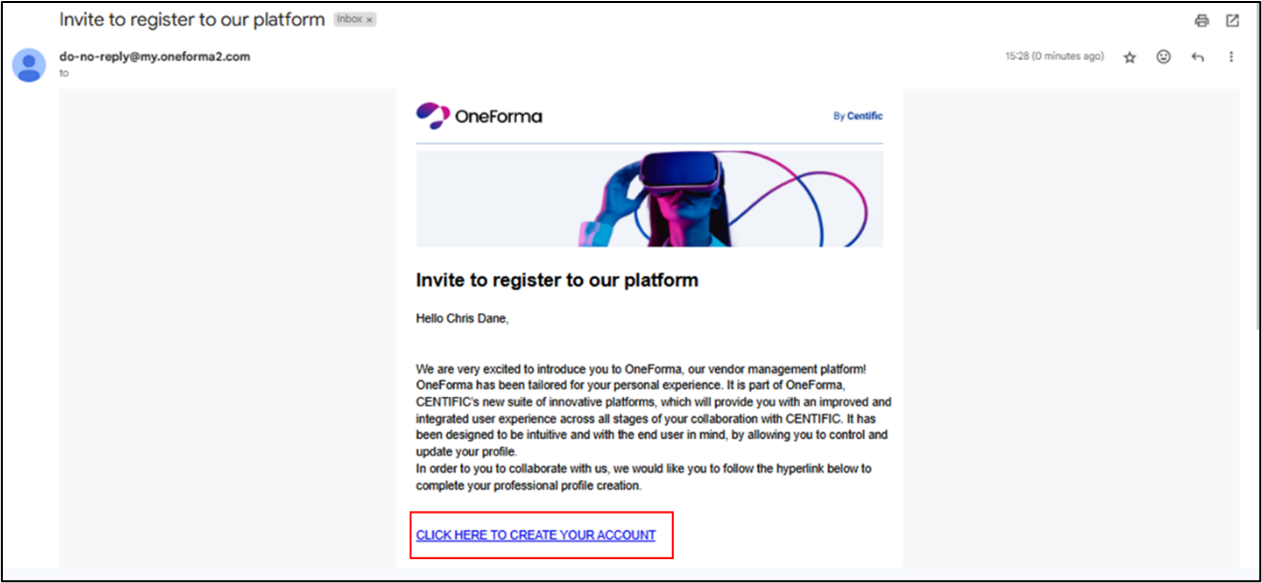
Step 1: Access Onboarding Invitation Email
- Open your email inbox and locate the invitation email to register with OneForma.
- Click the registration link provided in the email to begin creating your account.
Step 2: Complete Registration Form
- Enter your First Name, Last Name, and select your Country of Residence from the
- drop-down list.
Note: The email address field is pre-filled and cannot be changed. It corresponds to the email address, in which you’ve received the invitation from RM or VM. - Enter a secure password and re-enter the same to confirm.
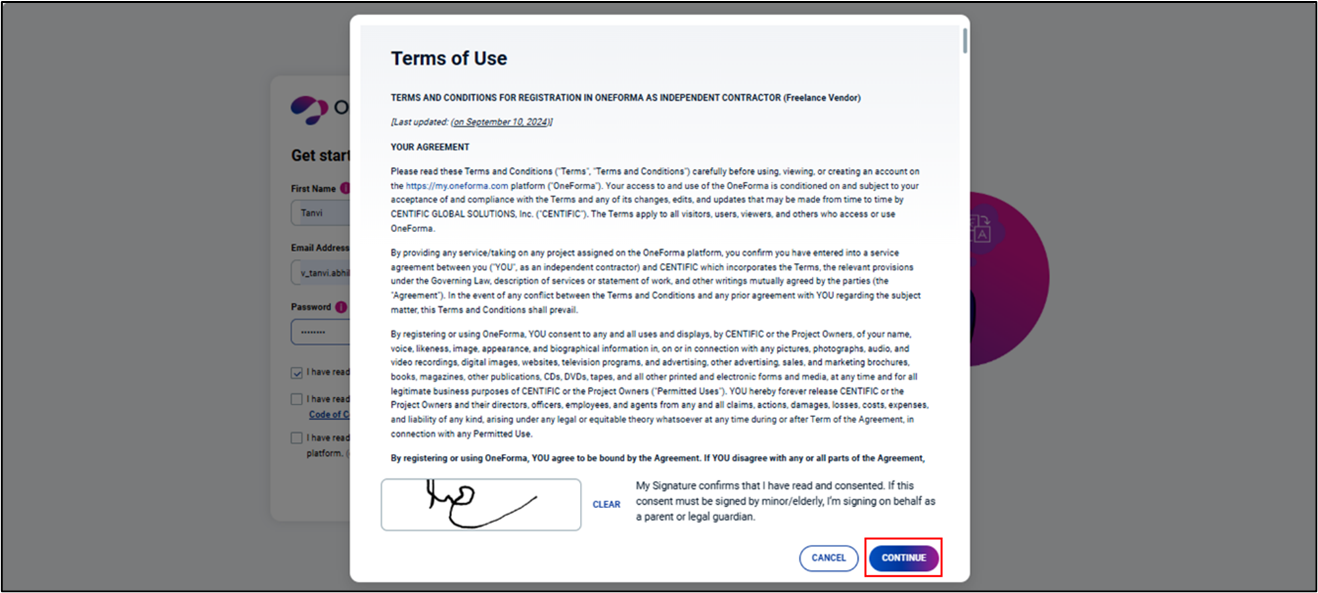
- Select the checkbox labeled “I have read and agree to the Terms of Use for using
the OneForma pages“, read through the Terms of Use conditions, scroll to the
bottom, provide your e-signature, and then click Continue.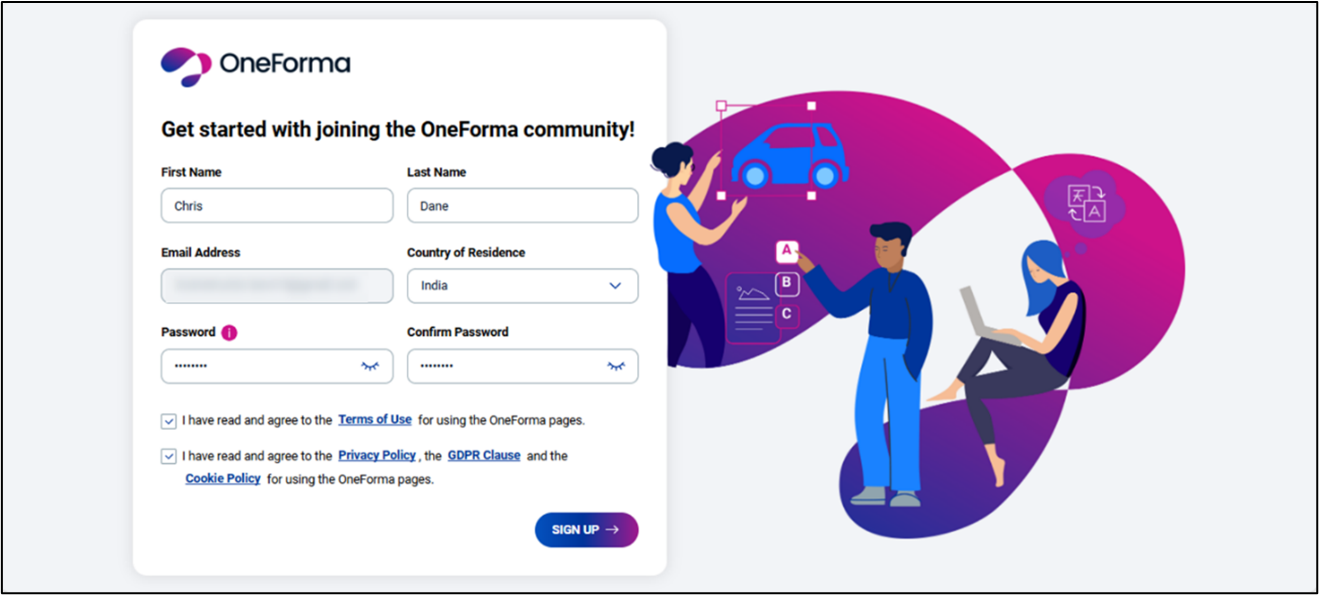
- Select the checkbox labeled “I have read and agree to the Privacy Policy, the GDPR Clause, and the Cookie Policy for using the OneForma pages“, after reading through it carefully.
- Click Sign Up.
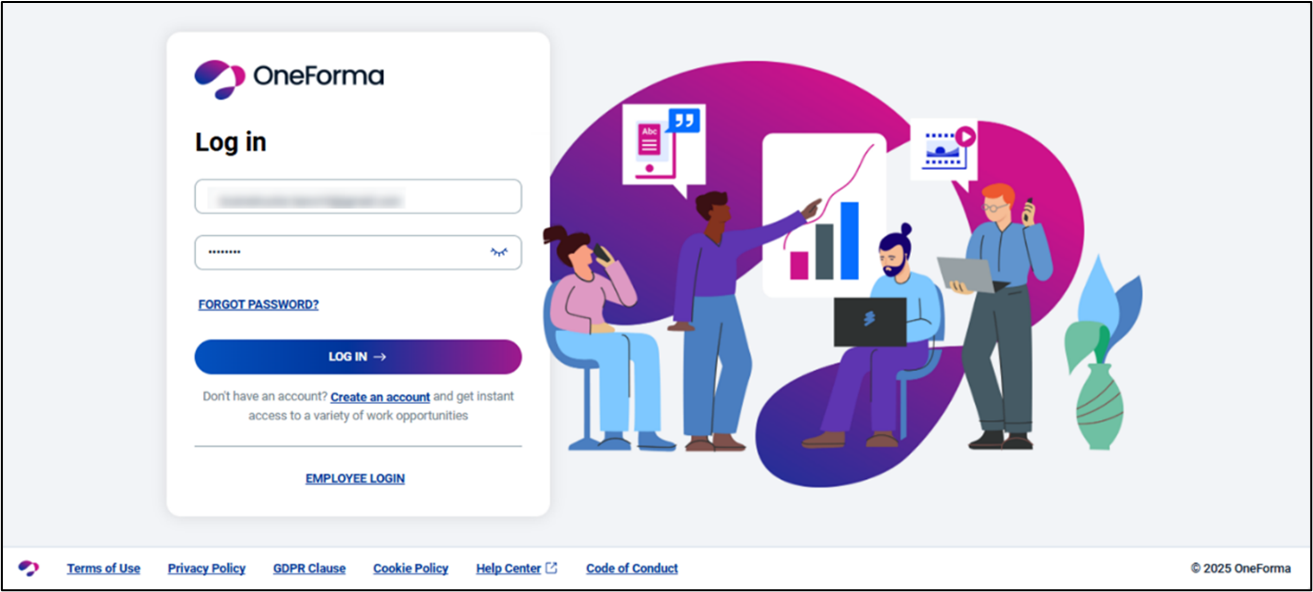
Step 3: Log In to OneForma
- Enter your Username (email address) and the Password you created during registration.
- Click Log In.
Step 4: Set Up Multi-Factor Authentication (MFA)
- Download an authenticator app on your mobile device.
- Scan the QR code displayed on the portal.
- Enter the generated six-digit code.
- Click Verify to complete the MFA setup process.
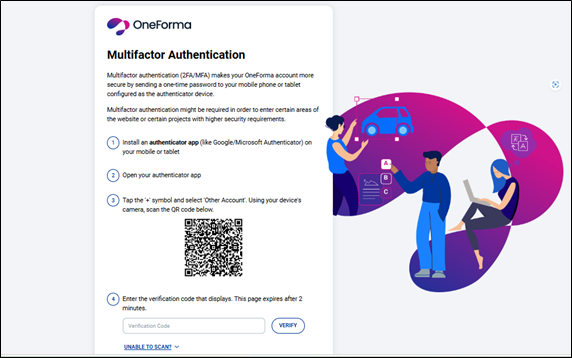
- IMPORTANT: Save the recovery key for future access.
- Click Continue.
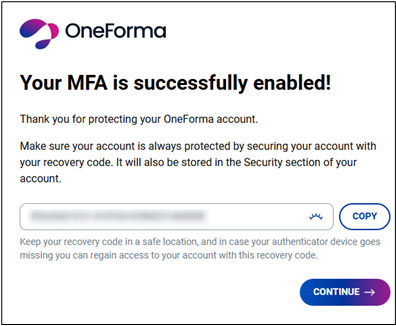
- A confirmation message appears, indicating that your account has been set up successfully. Click Continue to Profile to proceed.
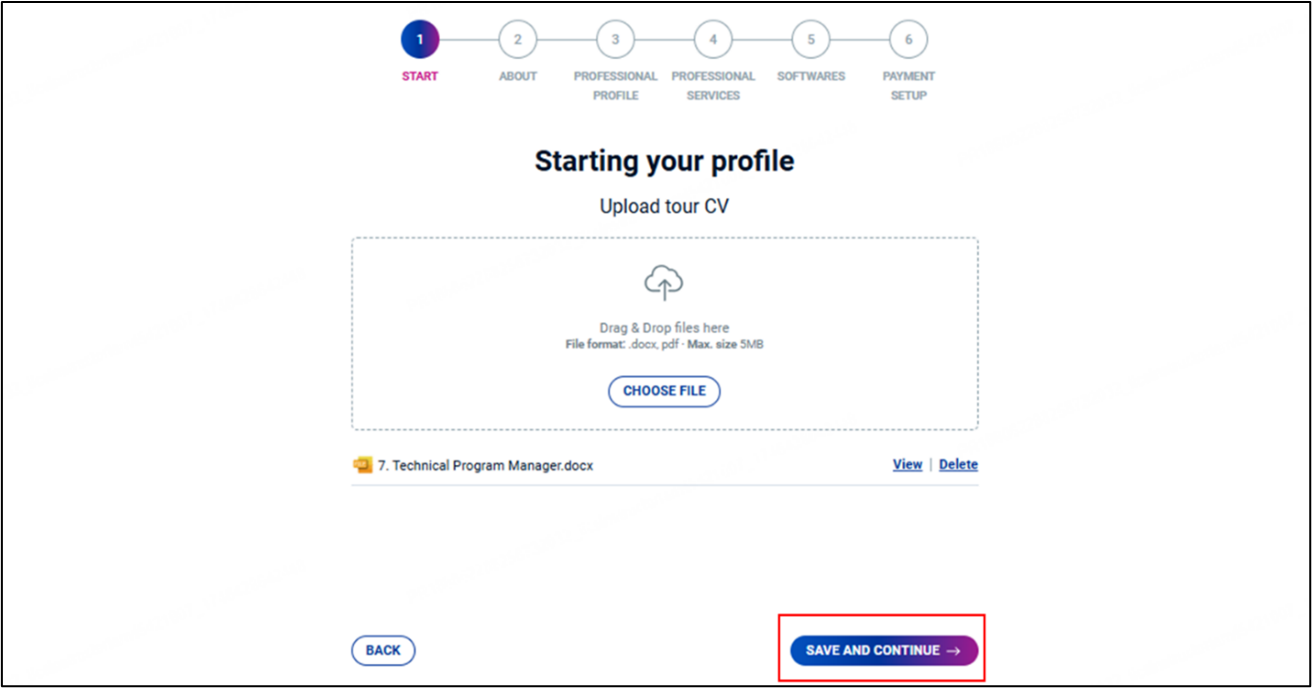
Step 5: Set Up Profile
You can enter all your personal and professional details, including your payment
configuration.
Upload CV
- You can either drag and drop your CV file into the designated area or click Choose File to upload .docx or .pdf file from your device.
- Click Save and Continue.
Add Personal and Contact Information
- Enter your Date of Birth, Tax ID, Gender, Nationality, Ethnicity, and your LinkedIn details if required.
- Enter your Address, a Primary Phone Number, and Additional Phone Numbers if
required. - Add Currency Information.
- If your country of residence is China:
o From the Legal Entity drop-down list, select China or USA.
▪ If you select China, the default currency will be CNY.
▪ If you select USA, the default currency will be USD.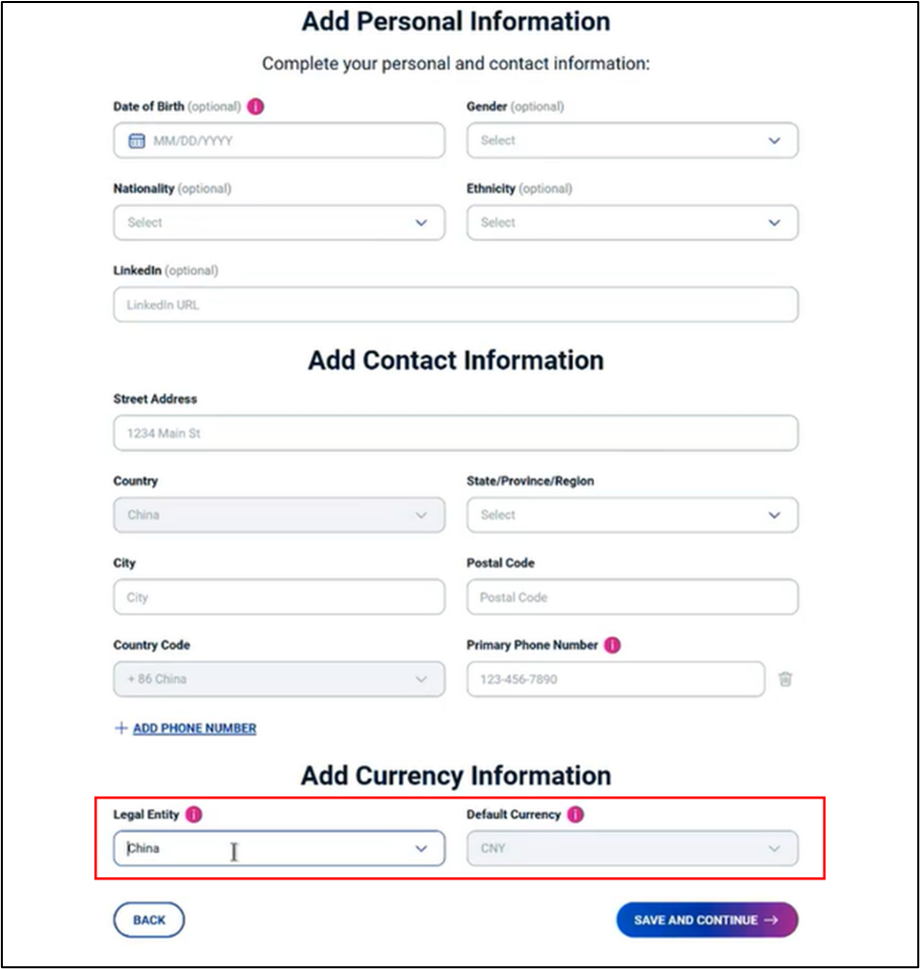
- If your country of residence is not China, Legal Entity field will not be displayed.
o Select Default Currency.
▪ If you are resided in USA or Europe, select USD or EUR.
▪ If you are resided in Japan, select USD or JPY.
▪ If you are resided in other countries, the default currency is USD.
- If your country of residence is China:
Note:
- You can set up Legal Entity and Default Currency only during the onboarding process. To change the details later, contact your Vendor Manager.
- After Legal Entity and Default Currency are updated by the Vendor Manager, the changes will be reflected on your profile under Payment Settings.
- If you had previously accepted service rates, their status will automatically change to Rejected. To update them, click Apply New Rate and set the service rate according to the newly selected currency.
4. Click Save and Continue.
Professional Profile
You can enter all your professional details, including your expertise, skill, work experience, and academic details.
Specialization
- Select at least one specialization from the available list. You may choose multiple specializations if applicable.
- Click Save and Continue.
Work Experience
- Your work experience details will be automatically parsed from the CV you uploaded. You can choose to Edit or Delete the parsed information as needed.
- To add additional experience, click Add Work Experience and fill in the required details.
- Click Save and Continue to move to the next section.
Education Details
- Select your Degree Level and Field of Study from the provided list.
- If you select a Master’s degree or higher, you will be prompted to upload supporting certificates.
Note: Uploading certificates is optional. - To add additional educational qualifications, click Add Degree Level and enter the relevant details.
- Click Save and Continue.
Professional Services
You can enter your language proficiency, add services and the associated service rates.
Language Proficiency
- Select your Native Language from the list.
- If required, you can add multiple Spoken Languages and their associated proficiency levels.
- If required, you can also add Translation Languages.
- Select source and target languages.
- Select relevant technical fields and the associated proficiency levels.
- Click Save and Continue.
Services Offered
You can add professional services you have experience with and add associated service rates.
Note: All the submitted rates are subject to approval by the Vendor Manager.
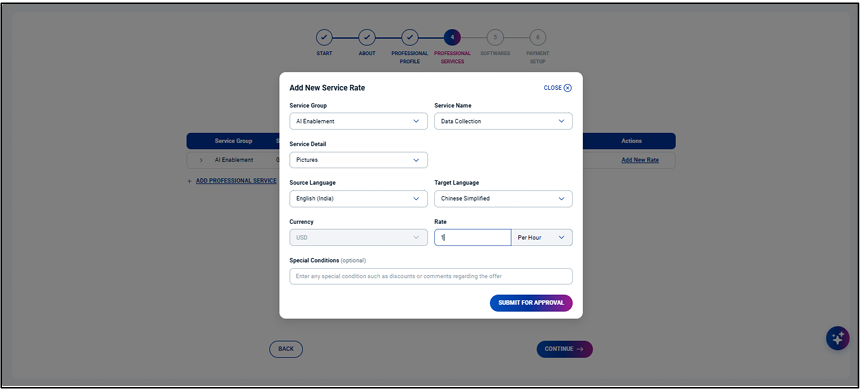
Add New Service Rate
- Select the appropriate Service Group, Service Name, and provide the necessary Service Details.
- Choose Source Language and Target Language for the service.
- Specify the Currency, Rate, and Rate Type (per word, per hour, or per task).
- Add any Special Conditions such as discounts, notes, or comments related to the offer rate.
- Click Submit for Approval.
- To add additional professional services, click Add Professional Service and provide the required details.
- Click Continue.
Revise Existing Service Rate
- Click Apply New Rate to update the existing service rate.
- Enter the revised amount.
- Add any Special Conditions such as discounts, notes, or comments related to the
offer rate. - Click Submit for Approval.
- Click Continue.
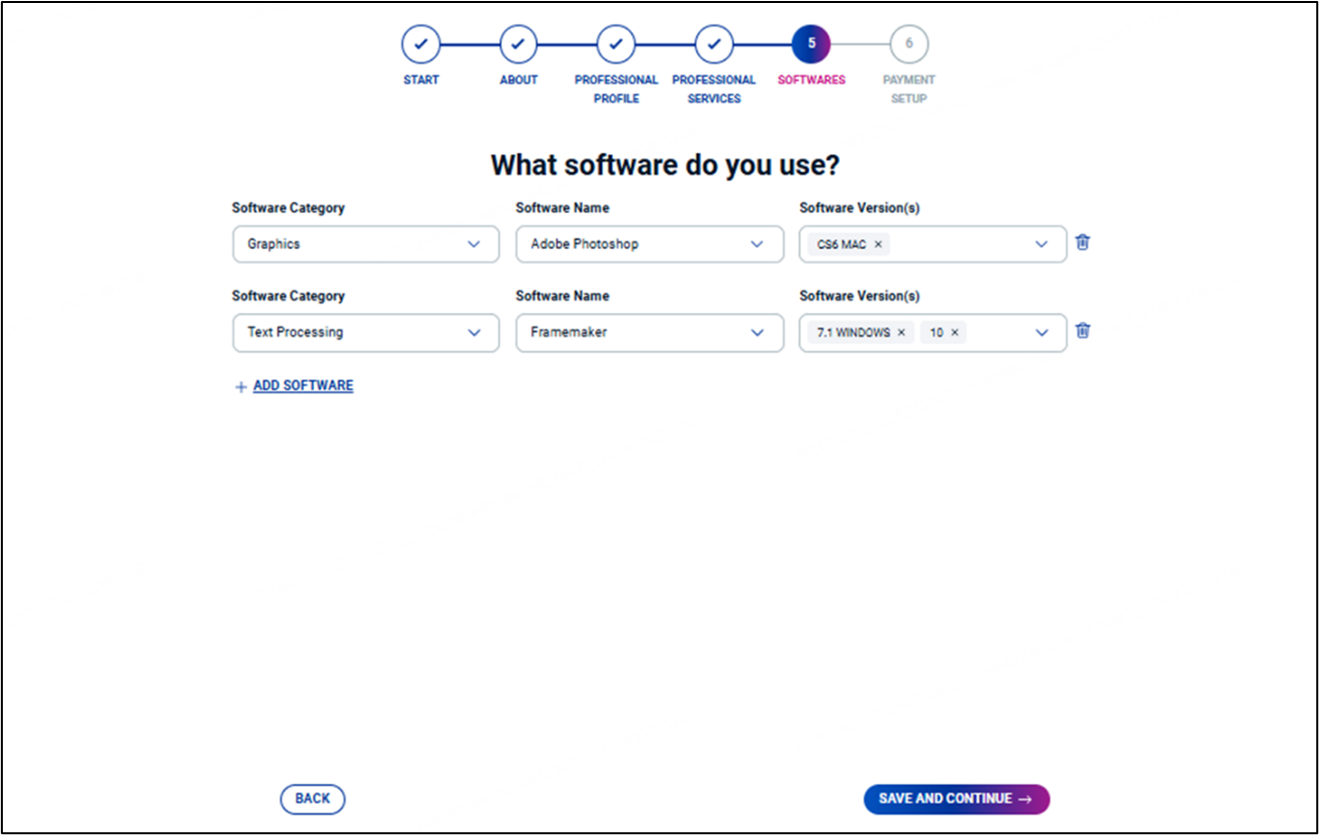
Software
- Select the appropriate Software Category, Software Name, and Version from the dropdown lists.
- Click Add Software to add additional software tools and repeat the above process.
- Click Save and Continue.
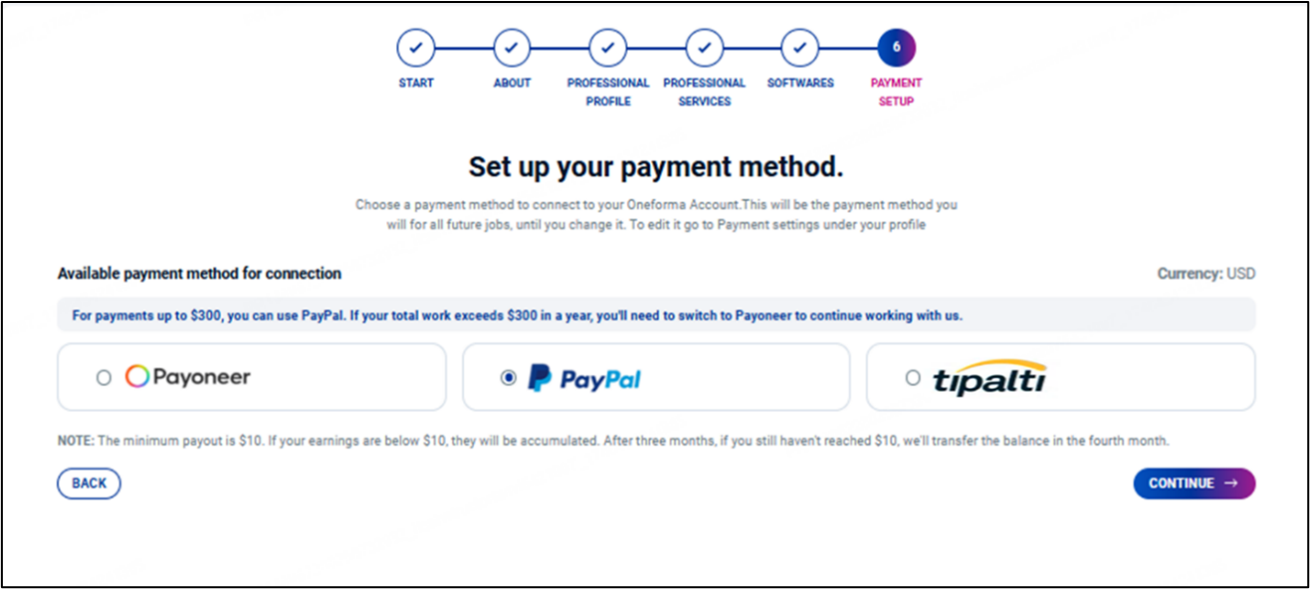
Payment Setup
- Choose from the available payment platforms.
- PayPal (up to $300/year)
- Payoneer
- Tipalti (for PayPal over $300/year or bank transfer)
- Bank Account (available only for resources based in China with the selected legal entity as China)
Note: During the onboarding process, you can select only one payment method. However, after onboarding, you can configure Multiple Payment Method Setup and set one of them as your default payment method.
- Click Continue to proceed with the setup of the selected payment method.
- Compete the setup of the chosen platform and click Conclude.
- Make sure to read the Non-Disclosure Agreement (NDA) and select the checkbox. Read through the document, scroll to the bottom, provide your e-signature, and then click Continue.
- Click Continue to complete the onboarding process, this will redirect you to your dashboard.
Wait for OneForma to approve your submitted tax forms.
After completing the above steps, your profile will become active, and you can start applying for jobs.
However, the tax forms you submitted must still be approved by OneForma. For certain payment methods, the account cannot be connected until all required verifications are completed. In other words, it will not be considered a payable account. Payments will not be processed for accounts that have not completed all verification requirements.
Wrap-Up
After these steps are successfully completed and approved, your recipient profile will be activated, allowing you to apply for projects and receive payments for your work.
Need More Help?
OneForma Support is here to help! If this article hasn’t given you the answers you’re looking for, try reaching out to us here. We’ll get back to you as soon as possible.